Sunday, August 25, 2013

Doctor Who Gift Idea

None of you know this about me yet, but I am a HUGE Doctor Who fan. I am basically obsessed with that show. My older brother actually got me into it over Spring Break back in March, and I haven't looked back since! The other day was my brother's birthday, so naturally, I had to give him something Doctor Who. Well, here's what he ended up getting :) :

First things first, here's the card I made him!
(And then I realized that I accidentally put "Police Call" instead of the actual "Public Call" at the top. Whoops, my bad!)


Oh, and it's bigger on the inside. ;)


Here's a link to the blog post that I followed to create this card:
Pretty cool, right?! Definitely give it a go!

And here's the actual gift I gave him. I'm all about saving money and DIY-ing birthday gifts. So this is what I ended up making him.
It's River's TARDIS journal!!


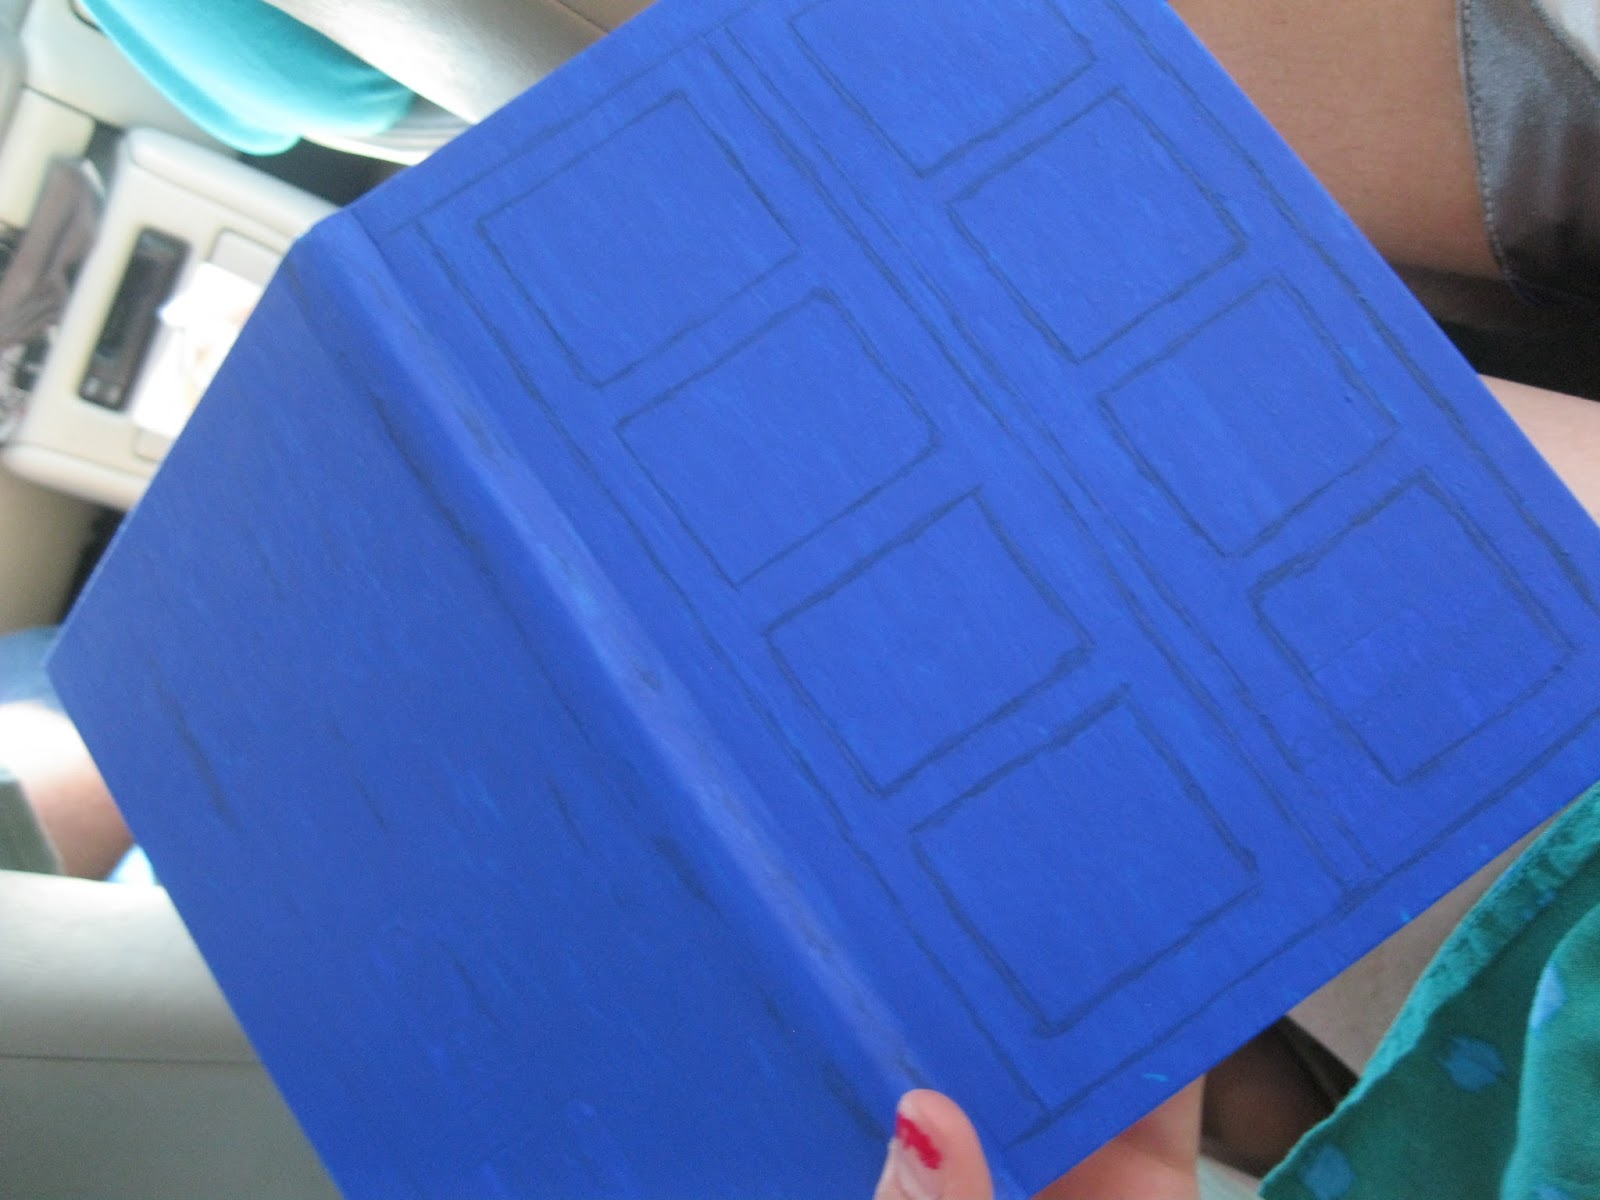
This gift was literally $0.97!! All I bought was a small notebook that I would be able to create indents in. Here's the steps I used below:

1. Drew outlines of TARDIS design on notebook with dry-erase marker.
2. Indented design where marker is marked with a random Popsicle stick I had laying around.
3. Wiped away marker marks.
4. Painted the entire notebook in 2-3 layers of TARDIS blue (or as close as can get) paint that I had sitting around.
5. Mixed a little bit of black into blue paint to create shadows where indented and along creases of spine.
5. Allowed to dry. If you want, you can set the entire thing with some sort of topcoat, such as nail polish or Mod Podge but I didn't.

That's it! Even after the couple layers of paint, I could still slightly feel the indents that I created for the design! SOOO easy and super cute too!!

So the question is... are you gonna try either of these DIY's out?! If so, let me know which one down in the comment section below! :D I would love to see how yours turns out!

Under-the-Skin Pimple DIY

One of the most painful beauty problems is under-the-skin acne. These are pimples that are too deep under your skin to be popped, and the slightest touch to this acne shoots a sharp pain through your face. I don't know about you but for some reason I ALWAYS get these pimples before special events... hormones, I know what you're doing! Lucky for you, I am here to show you an easy, quick, and pain-free way to reduce the swelling of these pimple monsters significantly. I have tried this method a few times and by the next day, my pimple has gone down by half the size. It really works.

This is just a super simple method that I thought up one day, using knowledge that hot steam opens pores and that Rosemary spice is good for skin and hair. Give it a try!

Here's all you need:

-A pot of water over the stove
-A small palm-full of Rosemary leaves
-A towel


1. Fill a pot with water until you reach your desired amount. I went almost 3/4 full.


2. Drop the small palm-full of Rosemary leaves into the pot of water.


3. Allow the water to boil.


4. Once boiling, take the pot off the burner and (I didn't show this part) laying the towel over the top of your head, place your face directly over the steam. DO NOT get too close! Instead, remain a comfortable distance away from the hot water. You want the steam to hit directly where your pimple is. Remain in this position for about 5 minutes. You should feel moisture on your face from the evaporated water.


That is all, my friends! Super simple, pretty quick, and actually effective. Seriously, every single time I've done this, the swelling has gone down significantly. It actually works! If you don't see results within the next few days, you might not have steamed your face long enough. Everybody is different; you may require a longer steaming than I do.

Let me know how this works for you! I'm curious to see if you have the same results I do! :)

Thursday, August 1, 2013

Product Review: ELF

You may or may not have heard of ELF (eyes lips face) products, but they are definitely something you should check out! I found them at Target but you can check out their website too.

I have been pretty impressed with ELF; I hate spending a lot of money on makeup, so I try to buy the cheapest things I can. A lot of ELF products usually run around $1-3, and I'm actually surprised by the quality for the price.  I'm gonna let you know what I think of the products that I've tried so far!

I'll start with the least quality experience first.

Just the other day, I decided I wanted to try ELF's cream/gel liner, so I picked some up! When I read the reviews online, a lot of people were very impressed with how smooth and easy to apply it is. I was very excited! However, I should have judged that by the amount of dust collected on the top of the packaging that this eyeliner would have dried out quite a bit, since no one seemed to want it. But I got it anyway. When I tried it at home, it was not easy to apply at all and was considerably dried out. I even tried melting it a bit with a lighter but as soon as it cooled, it was just as hard to apply. Although this is more the store that carried this product's fault for not replenishing it, I do not think I will try this eyeliner again. I am really glad it came with its own angled liner brush, though, because now I can use that to apply eye shadow instead of liner if I wish to.


The other product that I got that I wasn't very impressed with was the bronzer. I can't remember if this was $1 or $3. Anyway, I didn't like that the finish was shimmery. In my opinion, bronzer should be matte, so I didn't like this very much. Also, I'm afraid to apply too much to my face, as it will cause it to look dirty.


Moving on, I love most other ELF products!

I have been using the $1 apricot concealer for almost 2 years and although it doesn't cover my dark circles very well, the orange tone at least helps cancel out the blue-ish undertones on my under-eye a bit. It's super cheap and if you're not too picky about the coverage, this is a great alternative!


Next, I got the eye primer. If you use this for special occasions and not everyday use, it works wonders and your eye shadow barely budges. However, if you use this on an everyday basis, your eyelids will begin to get greasy from the formula. Or at least that's what happened to mine.


As far as eye shadows, I'm very impressed! I have a single dish of "Wheat" and I love the gold color and pigmentation! My sister has a palette with 100 eye shadow colors that are are surprisingly pigmented as well! Some of the colors even apply more saturated than my Coastal Scents 88 Palette, which I paid about $20 for, while my sister's was about or less than $10.


I also got one of the $3 blushes in Pink Passion, and the color is really good for my pale complexion. I've hit the bottom of the pan and would love to try some of the other blush colors. It's a pretty good blush for the price.


ELF also has $1 liquid liners that work decently. They obviously do not apply as well as $7 ones, but if you want a cheap route, this one works just fine! It applies very dark, which I love! Watch out, though, because it will rub away if you take a nap or rub your eyes. And if you do not use an eye shadow as a base, it applies watery because it has nothing to grab onto. All I do is apply a shimmering white eye shadow to highlight my eyes and that does the job! It works really well for winging liner, too!


Now let's talk brushes. ELF is known for their professional brushes and you can find cheap ones at Target. I have gotten two brushes; one is a wonderful dome-shaped blending eye shadow brush. I love this brush soo much! Any color that I apply to my crease is applied with this brush. The bristles are really nice quality and for only $1, you are truly getting the bang for your buck! It blends really well and distributes color evenly. I was a little concerned at first when I bought it, since the handle was a bit bent where it meets the metal, just before the bristles. It turns out, though, that the slight angle actually helps me apply the shadows easier. Best buck I've ever spent.


The second brush that I bought is a blush brush. It was only $3 and, again, I love it. The bristles are super soft and I love the tapered end to reach small shadows, such as my shimmering white shadow to highlight my cheeks. I actually didn't realize how awful my previous blush brush was until I began using this ELF one. I swear that it was made from horse hair because the bristles were so coarse and when I would wash it, it emitted an awful, awful smell (like wet horse hair..). The ELF brush has had no such issues, but I'm still testing to see how it smells once it is completely dried from it's first wash. I will inform you that just a few days ago, I finally threw away that old blush brush with no regrets! Thankfully, I didn't pay one penny for that old brush because it came in a makeup kit from Ulta as a gift. So anyway, the ELF blush brush is wonderful. If my brush ends up getting ruined from the wash, or just from wear, I will definitely buy another one.


I have not yet used the ELF mascara and I don't see myself doing so in the future. If I'm going to spend $3 on it, I'm willing to spend 2 or 3 more dollars for a Maybelline mascara (like Falsies or Colossal) that I know I'm going to like. :P But if you have tried it or are planning on it, let me know how it works for you!!


Well, I think that's about it! That is all that I've tried from ELF. I love most of the products and even if you don't, the cheap price is nothing to fret about. If it doesn't work out for you, it's easier to get over than a $10 product.

Let me know if you've used any ELF Products and what you thought of them. If you have any to recommend, please let me know! Also, if you know of any other cheap-but-quality brands that you'd like me to try, let me know! I love to experiment. :)

Tuesday, July 16, 2013

Trending: Sleeveless Blouse

You are probably thinking, "It's summer.. Of course people are wearing tank tops.." Absolutely! But that's not exactly what I mean when I'm thinking of sleeveless shirts. :) Take a look at what I'm thinking of:

Sleeveless #1

Blouses with collars have been HUGE this year, and I've been seeing this trend roll over into summer as people are now wearing sleeveless versions. I love it! These types of blouses are super comfy and airy, perfect for summer. They're also VERY versatile.

A work-appropriate look:

Work

An edgy work look:

Edgy Work

A polished look:

Polished Look

Another summer look:

Summer


As you can see, there are so many way these sleeveless blouses can be worn! They are so versatile that every woman should have one in her closet. I'm still on the hunt for mine and I'll let you know when I find it. ;) In the mean time, let me know which outfit was your favorite and tell me about your sleeveless blouse!

Thursday, July 11, 2013

Clean Your Earrings DIY

Ladies (and gents), it is SO important to clean your earrings. I know, I forget to take the time to do it too, but today that's gonna change. Here's how you can clean yours at home, without any expensive earring cleaner (if there is such a thing...).

The first way that I cleaned my earrings was with Hydrogen Peroxide. You might have heard that Hydrogen Peroxide is good for fighting infection; this is very true! I, myself, have used it on my ears when they have begun to get infected and it really does the trick. So, in order to prevent infection caused by nasty, unclean earrings, simply soak your earrings in Hydrogen Peroxide.


It's a super easy way to clean your studs. All you need to do is separate the backs from your earrings and soak. I'm letting mine sit for about a half hour. You should start to see bubbles appearing on your earrings, and if they are dirty enough, the bubbles will rise to the top.

As you can see, I have some really cheap metal earrings because they have changed color from wear.


The next thing you can do to clean your earrings is using alcohol. For my dangling earrings, I used alcohol swabs. Alcohol kills bacteria, which is why it's a good way to clean the earrings you cannot soak in Hydrogen Peroxide.


Well, it's as simple as that! I have used these methods before and I haven't personally noticed any sort of deterioration in the quality of my earrings from the alcohol or peroxide. Let me know what you think and if you've used this tip before!

Saturday, July 6, 2013

Yum-Yums: Home-Made Frappes!

Frappes are my choice of drink for the summer months. On a hot summer day, a refreshing frappe to drink while lying out in the sun is ideal. If you cannot afford to get some cold coffee at a McDonald's, Caribou Coffee, or a Starbucks every day during the summer, however, you have come to the right place! Today I am going to share with you how to make your own frappes in the comfort of your home. :)


To start off, here's what you need:

  • Blender
  • 1 cup chocolate milk (can substitute with 1 cup milk and a couple scoops of chocolate powder or syrup)
  • 1 cup coffee
  • As many chocolate chips as desired, or in my case shredded chocolate almond bark
  • 1 tsp vanilla extract
  • 2 cups of ice
  • A few small scoops of vanilla ice cream
  • Whipped cream
First, depending on what type of blender you have, you may or may not be able to add the coffee straight from your coffee machine. For me, it recommends not to put anything hot in, so I cooled my coffee in the freezer for approximately a half hour.

Next, put everything except for the whipped cream into the blender and blend until you reach your desired consistency. As it says above, in my case I didn't have any chocolate chips or any Hershey's bars, so I shredded chocolate almond bark into mine. Everyone is different and some people might want more coffee flavor while other might want more chocolate flavor, so add as much as you want.

After everything is nice and blended, pour into a tall cup and top with whipped cream. If you wish, you can add chocolate drizzle or chocolate shreds on the top.

Hope you enjoy and let me know how yours turned out! Mine was delicious, so I hope yours is too! :)

Friday, July 5, 2013

Trending: Patterned Pants

Patterned pants have been around a lot this year and are continuously evolving. What do you think of this trend? Here are some examples of patterned pants that I personally don't like:


I'm really not liking the wide-leg patterned pants look. The fact that they are patterned makes them bold already, but by making them wider I feel like they become too bulky and too bold.

Here are some patterned pants that I think work really well and are very flattering:


I think patterned pants look best as skinnies. This way, they aren't too bulky and add just enough pattern to any outfit. So what style of patterned pants do you find the most attractive?

(These photos are not mine; I give all credit to whomever these belong to!)